How to Remove a Page from Word: Quick and Easy Ways to Delete Extra or Blank Pages
Hey there! 🌟 If you’ve ever found yourself struggling with extra or blank pages in your Word document, you’re not alone. Whether you’re preparing a report, a resume, or just cleaning up a draft, those pesky extra pages can be a real headache. But don’t worry – I’ve got you covered! In this guide, we’ll walk through the simplest methods to remove those unwanted pages from your Word document, ensuring your work looks polished and professional. Let’s dive in!
Table of Contents
ToggleWhy Extra or Blank Pages Appear
Before we jump into how to delete those extra pages, let’s quickly understand why they might be showing up:
- Accidental Page Breaks: Sometimes, pressing “Enter” multiple times or inserting a manual page break can create blank pages.
- Formatting Issues: Excess space from margins, headers, or footers can push content onto a new page.
- Tables and Images: Large tables or images that don’t fit the page can force extra pages.
- Page Layout: Changes in page layout or size can sometimes cause additional blank pages.
How to Remove Extra or Blank Pages in Word
Method 1: Delete Page Breaks
- Show Formatting Marks: Press
Ctrl + Shift + 8to reveal formatting marks. This will show page breaks, paragraph marks, and spaces. - Find the Break in the Page: To locate the page break in your document, scroll through it. It will appear as a dashed line labeled “Page Break.”
- Delete the Page Break: Place your cursor just before the page break line and press
Deleteon your keyboard.
Image Suggestion:

Method 2: Remove Extra Paragraphs
- Show Formatting Marks: As before, use
Ctrl + Shift + 8to make paragraph marks visible. - Delete Extra Paragraphs: Go to the blank page, place your cursor at the beginning of the paragraph marks, and press
BackspaceorDelete.
Image Suggestion:

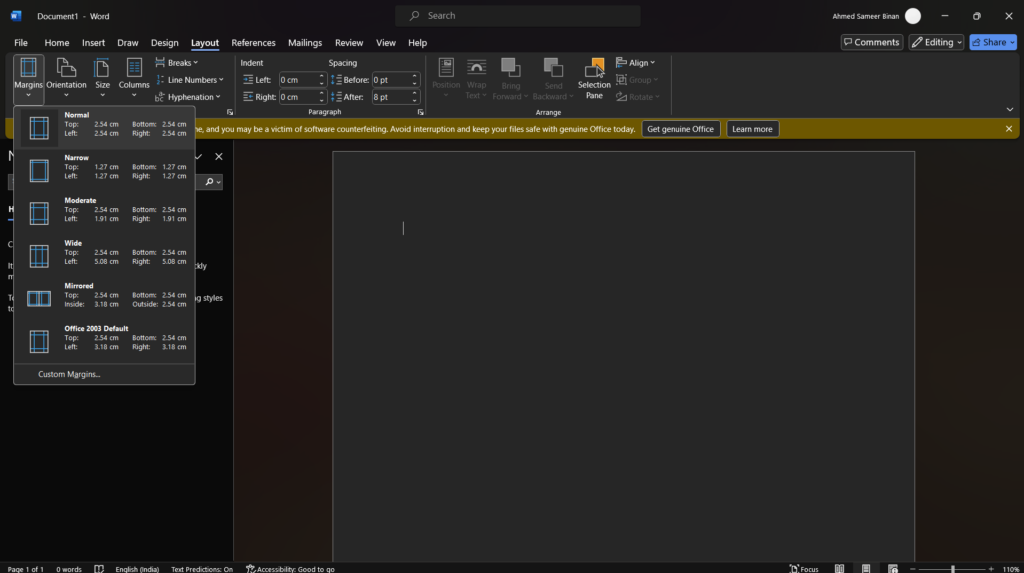
Method 3: Adjust Page Margins
- Go to Page Layout: Click on the “Layout” or “Page Layout” tab.
- Set Margins: Click “Margins” and select “Custom Margins.” Adjust the margins to see if that removes the blank page
 Screenshot of the Page Layout tab with the Margins option highlighted.
Method 4: Resize or Adjust Tables and Images
- Select the Table or Image: Click on the table or image that might be causing the extra page.
- Resize or Move: Adjust the size or move the table/image to fit within the page boundaries.
Method 5: Check for Hidden Text or Objects
- Reveal Hidden Text: Go to “File” > “Options” > “Display” and check the box for “Hidden text.”
- Remove Hidden Content: Delete any hidden text or objects that might be causing an extra page.
Tips for Preventing Extra Pages
- Use the “Find and Replace” Feature: Press
Ctrl + H, then use “Find” to locate extra page breaks or paragraphs, and “Replace” to remove them. - Review Document Layout: Regularly check your document’s layout and formatting to avoid unexpected page breaks.
- Update Page Size: Ensure that the page size in your document matches your desired output (e.g., A4, Letter).
Conclusion
There you have it – quick and easy methods to remove extra or blank pages from your Word document. Whether it’s deleting page breaks, adjusting margins, or resizing images, these tips will help keep your document looking its best. If you find yourself with more questions or need further assistance, don’t hesitate to reach out. Happy editing!
Keywords: how to remove a page from Word, delete extra pages in Word, remove blank pages in Word, delete page breaks Word, fix formatting issues Word.


